Monday, April 27, 2009

To Paint

Painting today at the Studio.

My tall order for today.  I haven't picked up my brushes for days.  Work and motherhood filled up my days.  Contrary to what others believe that art can be instantly created whenever an artist desires to, it doesn't often happen.

Here's an example:  

Attempt No. 1 - My little one trails behind me as I opened the door to my studio.  I know exactly what he'll go for - my tray of watercolor tubes.  He prefers that over his own set that I laid on his table.  That means, skip watercolor today. 

Attempt No. 2 - Doorbell rings while I'm filling up the jar with water for the acrylics.  Unexpected but a welcome visitor.  Then, there's lunch and phone calls to make.

Attempt No. 3 - Nap time for the little man.  Only after we danced 'Shimmie Shake' by the Wiggles.  In less than eight weeks, Anthony, Greg, Murray and Jeff have now been familiar names in our household.  Off to dreamland he goes.  Ah, it's that time!  Finally.

Attempt No. 4 - Tiptoe, then silently close the door.  Don't forget to turn on the baby monitor.  Okay, here it goes.  Squeeze paints, dab brushes, paint away.  

Let the worries wait, it's my time . . . to paint.

Friday, April 24, 2009

Happy Etsy Day


The world's largest creative online merchant venue celebrates 'Etsy Day'.  Popularly known as the place to buy and sell all things handmade, it has grown to be the portal of choice for most indie businesses.

Through Etsy, budding entrepreneurs even younger than eighteen (restrictions apply), can open up a shop and sell their handcrafted creations.  Crafty stay-at-home moms and professional artists alike have found home in Etsy, selling their wares.  

Shopping at Etsy couldn't be easier.  With few clicks, you'll find unique arts, crafts and gift items ranging from as little as 20 cents to thousands of dollars.  

So, what are you waiting for?  It's time to say...


Monday, April 20, 2009

Art Lesson No. 5 - Handmade Tags


Before you throw those scrap of card stock cut-outs, pause for a while.  You can save couple of dollars by turning those into personalized, handmade tags.

Store bought tags are usually 49 to 99 cents each.  Might be cheap but those add up come the holidays.  So, why not make your own?  Here's how:

1.  Gather scraps of card stock, paper or cardboard
2.  Cut in desired shapes
3.  Scribble or hand-stamp with your own message.
4.  Punch a hole.
5.  Loop a yarn or ribbon.

It's that easy, you get to help reduce waste by recycling too.

Enjoy your new tags!  

Saturday, April 11, 2009

UrArtist in Bouf


My iPhone Sleeve is currently featured this week in Bouf, a UK Home Accessories Site. 

Wednesday, April 8, 2009

Savvy Brides


Showers are definitely happening this Spring.  I'm not talking about just rain showers, but bridal showers.  That's right, spring is the second most popular season for weddings, next to summer.

Savvy Brides these days  won't let their bucks flow right through, they're using their hard-earned budget wisely.  

A lovely bride from Texas asked me to design their custom labels with three things in mind - simple and classy with a peach background.  

So, if you're a bride looking for ways to save, go to Etsy, your place to buy all things handmade.

Monday, April 6, 2009

Why it Pays to be Green


Did you know that one less grocery bag per person in a year would reduce waste by 5 million lbs. and save $250,000 in disposal costs?  

So, shop smart and stay 'green'.   These reusable and washable baggies are my best bets.  

I'm totally saying 'bye' to plastics.  How about you?

Saturday, April 4, 2009

Art Lesson No. 4 - DIY Fine Art Note Cards


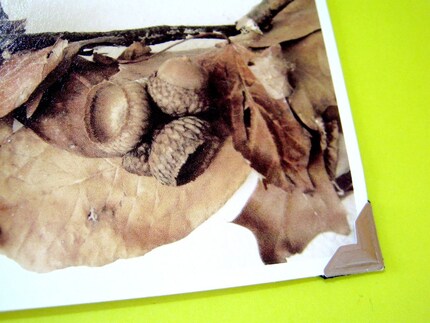
'Goodbye Winter'. Detail.
'Goodbye Winter'.  Fine Art Photo Card.  $4.99
Available online at urartist.etsy.com

Are you an avid photographer with stacks of prints mounting up?  With few easy steps, you can transform your pile into fine art notecards.

What you need:

- cardstock (colored or plain)
- plain white paper (optional)
- photo corners (you can get these at craft stores in scrapbooking section)
- glue
- scissors/ rotary cutter
- envelopes (to fit your card)

What to do:

1.  Select a good quality photo from your pile.
2.  Pick either a complementary of contrasting colored cardstock.
3.  Fold the cardstock in two
4.  Glue 4 photo corners in the cardstock.
5.  Place the photo within the photocorners

Now you're ready to write a message in your beautiful handcrafted fine art notecard.  Don't forget the stamp.